【Arduino】十種錯誤操作…而毀壞 Arduino 的原因
Arduino Uno,而這是絕大多數 Arduino入門者第一塊擁有的控制板
因此有必要對它做多一點的瞭解
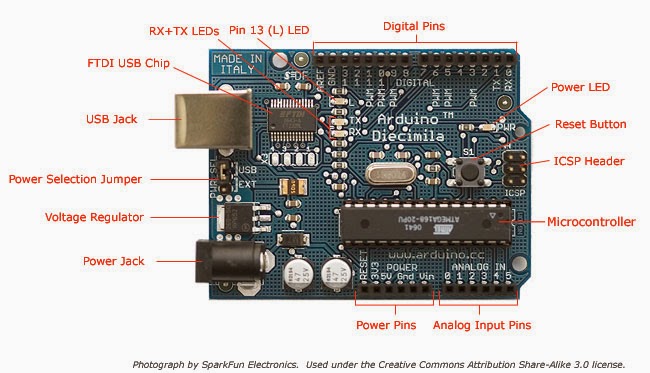
下面圖片顯示了 Arduino Uno 幾個重要的元件,並可清楚看出腳位標示。

這篇不是要談對晶片板暴力相向的行為。我們要以電子邏輯來解釋,告訴你如何避免 Arduino 的毀壞。當元件發出奇怪的氣味,或是出現"程式無法同步" 的可怕錯誤訊息….. — 總之,集合十大痛苦經驗於一篇。如果您擁有一片 Arduino,最好要知道甚麼該做,甚麼不該做!
最容易疏忽而出錯的部分在連接下排 [ Power Pins ] 時….
由左到右依序是:RESET | 3.3V | 5V | GND | GND | VIN其中,GND(有兩組)代表接地,RESET是重新設定
而 3.3V/5V/VIN 代表電源輸出
假如左下角 Power Jack 插入外部電源 9V
吃 3.3V 的裝置,要接在 3.3V 針腳
吃 5V 的裝置,要接在 5V 針腳
吃外部電源的裝置,要接在 VIN 針腳(這個CASE裡=9V)
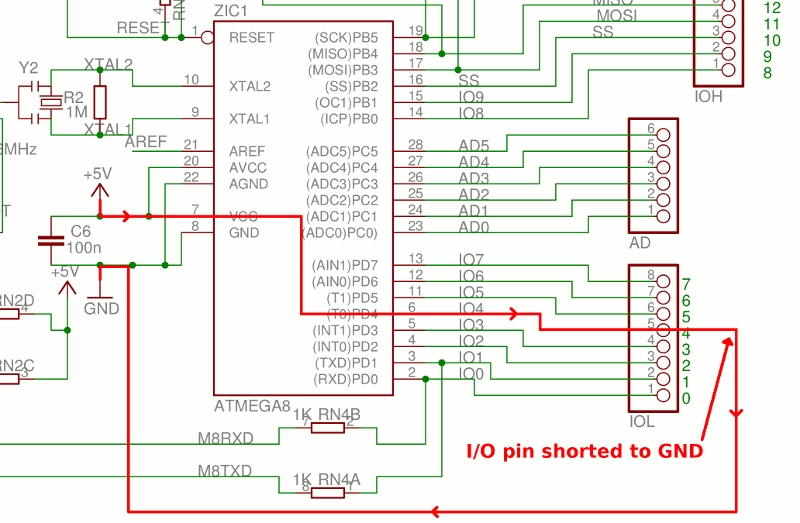
Method #1: 將任一個 I/O Pins 與 GND 連接形成短路
HOW
確認一個 I/O pin是設為output/high的狀態。把這個pin與ground連結。這樣就產生了一個過載的回路狀態,這個 I/O pin 立即就會損毀。
WHY
下圖是電流的流向 (Arduino Uno):
微控制器資料表指出,每個針腳的最大絕對電流值為 40mA 。每個針腳典型內部的電阻只有 25 歐姆,一個接到地面的短路可以允許多達 200mA 的電流流動,這些電流遠遠超過並足以銷毀微控制器的針腳。
Method #2: 將 I/O Pins 相互連接
HOW
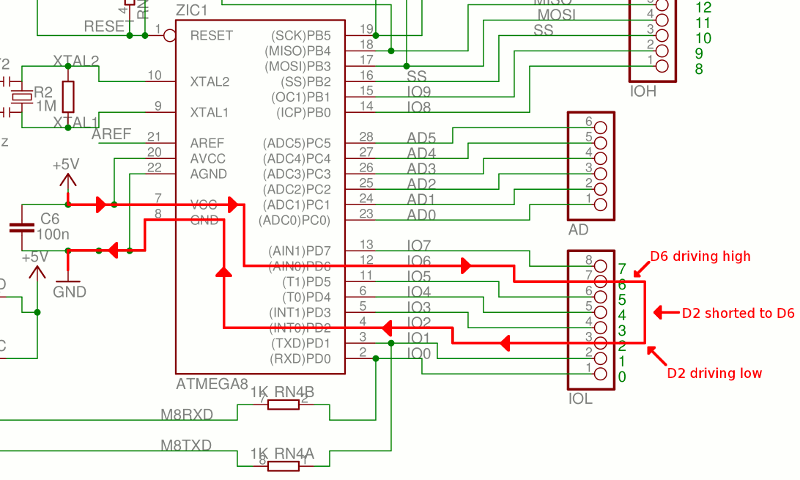
確認兩個 I/O pin都是設為output/high的狀態。把這兩個pin連結在一起。這樣就產生了一個過載的回路狀態,這個 I/O pin 立即就會損毀。
|
|
a short to ground can allow as much as 200 mA of current to flow, more than enough to destroy the microcontroller pin ( maximum per-pin current of 40mA ). |
WHY
電流流動的情形和狀況一相同,這些電流足以銷毀微控制器,差別在於上面案例裡流經接地的電流,這次是通過微控制器內部。
Method #3: 將過大的電壓導引到 I/O Pins 上
HOW
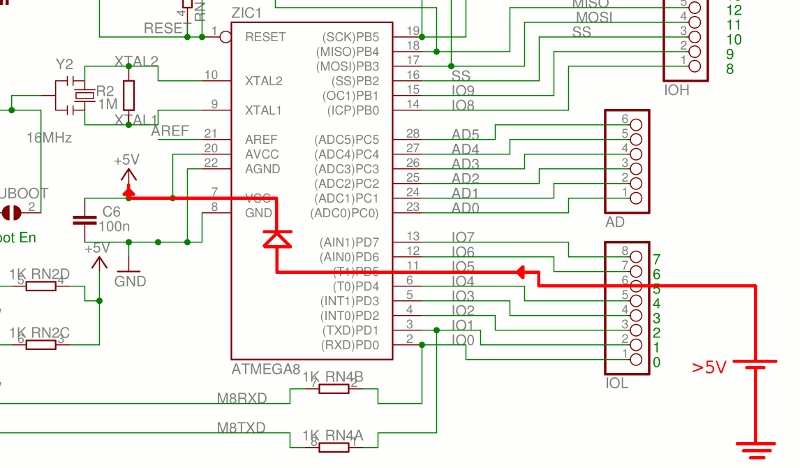
將超過5.5V的電壓連接導引到任何一個 I/O Pin 上,都足以銷毀這個針腳。
WHY
外部電流的瞬間增加,順向偏差(forward-biases)導向微控制器內的ESD防護二極體。下圖是 Atmel ATmega328P 所提供的官方資料,顯示微控制器內部每個針腳的模型。
一旦在 I/O Pin 的電壓大於供電電壓 (+ 5V)超過 0.5V 時,頂部的二極體開始指揮電流。對於短期過電壓事件(如 ESD靜電放電)是合宜的策略,但這種二極體不是在任何的時候都被需要。它的存在很簡單,燒毀並停止電流經過,以保護 pin。
下面的簡圖顯示,當一個 I/O Pin 過載時,電流如何流動。
假如內部防護護二極體失去作用而沒有開啟,當電壓過載時會銷毀這個 I/O Pin。假如防護二極體因短路而無法作用,甚至有可能造成過載的電壓將全部的 +5V 導入Arduino晶片內。這意味著它們將進一步毀壞其他的電路板上的原件,例如 USB 介面的處理晶片等。
HOW
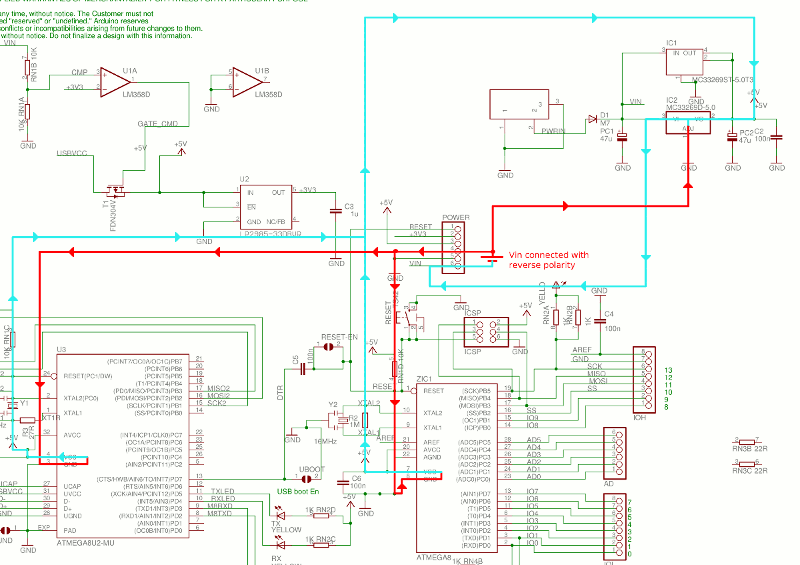
將外部電源的極性反接,這樣會銷毀Arduino上頭的數個裝置。
WHY
由於外部電源連接器針腳沒有具備反向電壓保護。電流會反向依序從 GND 針腳流向 ATmega328P 然後經過 5V pin,由 5V 穩壓器最後到達Vin。同樣的事情會發生與 ATmega8U2 微控制器。微控制器和 5V 穩壓器將會因這個舉動而銷毀。
|
|
CLICK FOR LARGER IMAGE : https://ruggedcircuits.com/assets/images/method10t.gif |
HOW
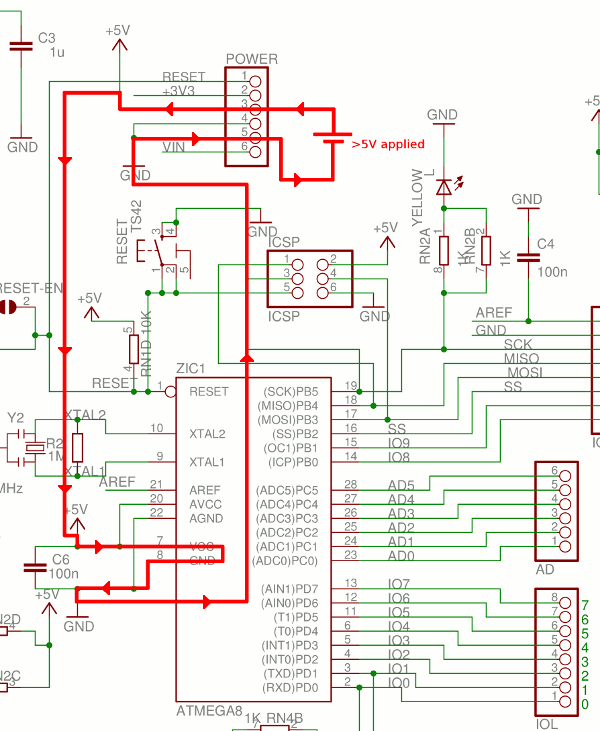
將 6V 或更高的電壓直接導入 5V 的連接器針腳。Arduino 上的許多元件都將因此而損毀;此外,這股電壓還可能竄入您電腦的 USB 埠,從而損壞它。
WHY
與 5V 連接器針腳相連處沒有任何的保護措施。電流是直接連接到 ATmega328P 微控制器、 ATmega8U2 USB 介面晶機和 5V 穩壓器,所有當電壓超過 6V 時,產生的電流流動都可以讓這些原件遭受損壞。下面是電流通過 ATmega328P 微控制器的路徑。
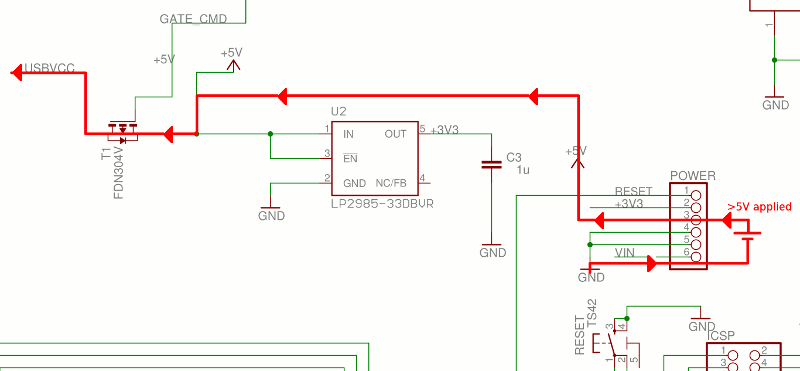
這是一個常見的錯誤認知:Arduino 5V 穩壓器會確保 5V 電壓維持在 5V,不論如何。事實並不是這樣!5V 穩壓器能做的唯一一件事是控制從 USB 埠或是外部 DC 電源提供的電量。假如外部電源直接連接 5V 針腳,5V 穩壓器將不會發揮任何的作用。
另一個應用超過 5V 電壓連接 5V 針腳的後果,PC 的 USB 埠可能損壞。如果 Arduino 的電源來自 USB ,而此電壓過高會導致當前的電流通過電壓開關 MOSFET T1 ,並向後回流到 PC 的 USB 埠。
The 3.3V connector pin has no protection circuitry. This voltage is directly connected to the Arduino 3.3V regulator and any other shields or devices that are powered by this connector pin. If the voltage exceeds 9V, the 3.3V regulator will be destroyed and may allow current to flow backwards to the 5V node, and then backwards further to the PC's USB port. The excessive voltage will also destroy the two devices connected to the 5V node: the ATmega328P and ATmega8U2 microcontrollers.
HOW
將 3.6V 或更高的電壓直接導入 3.3V 的連接器針腳。任何 3.3V 套件上的裝置,或其他透過此 pin 供電的裝置都將損毀。使用 9V 以上的電壓,將直接摧毀 Arduino 3.3V 穩壓器,電流還會反向竄入電腦的 USB 埠。
WHY
與 3.3V 連接器針腳相連處沒有任何的保護措施。電流是直接連接到 Arduino 3.3 v 穩壓器、任何 3.3V 套件上的裝置,以及其他透過此 pin 供電的裝置。如果電壓超過 9V,3.3V 穩壓器將會燒毀,並可能導致當前的電流倒流回到 5V 節點,然後進一步到 PC 的 USB 埠。電壓過高還會毀掉兩個連接到 5V 節點的設備: ATmega328P 和 ATmega8U2 微控制器。

|
|
If the Arduino is powered from USB then this excessive voltage can cause current to flow backwards through the voltage-switching MOSFET T1 and back to the PC's USB port. |
Method #7: 連接 Vin 與 GND
HOW
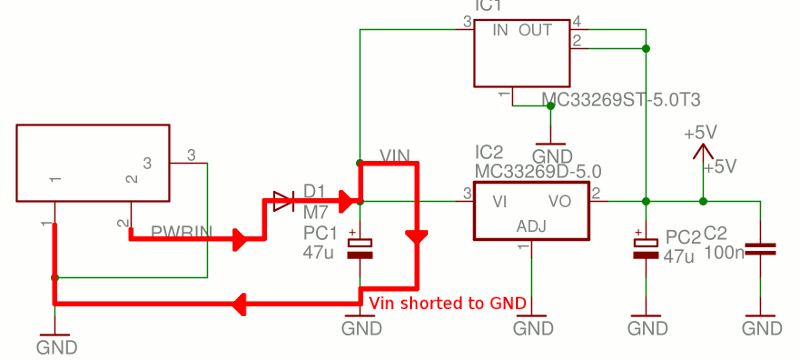
電源直流電源從 Arduino Vin 針腳 到 GND(接地端)阻流二極體將被銷毀,Arduino PCB 上的電路可能融化,毀壞。
WHY
與 Vin(外部電源)連接器針腳相連處沒有任何的保護措施。由外部電源提供電流通過 Vin 與 GND 之間的短路,將有效率且輕易的超過阻流二極體的極限。
電流容量的上限是取決於 Arduino 電路板上的電阻與電源輸入的強度。如果電流過高,不僅損壞 D1 二極體,連同 PCB 上的電路也可能因為這個大電流的熱量而熔化。
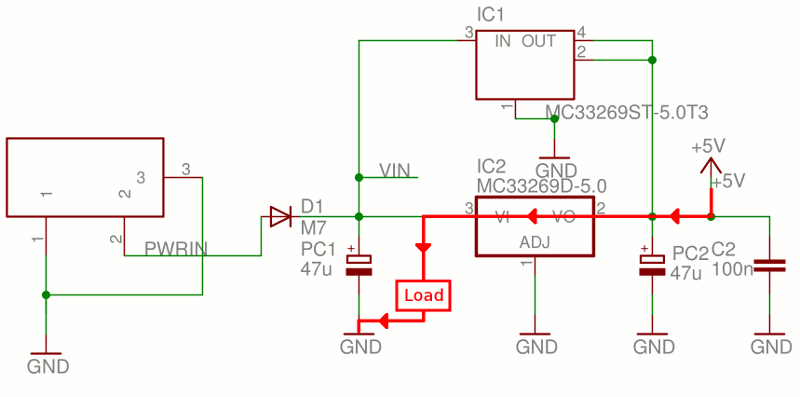
Method #8: 電源由 5V 針腳連接外部電源供應,Vin 有迴路連接
HOW
如果你以 5V 外部電源直接連接 5V 連接器,同時 Vin 針腳有連結一個迴路 (也就是 Vin 與 GND 之間有一條短路),電流將倒流通過 5V 穩壓器並銷毀它。
WHY
沒有反向電壓保護,因此當前的 5V 穩壓器倒流到 5V 針腳,便會通過調節器,並對所有從 Vin 所供電的裝置造成傷害。
|
|
There is no reverse voltage protection on the 5V regulator thus current can flow from the 5V connector pin, backwards through the regulator, and to whatever is connected to Vin. |
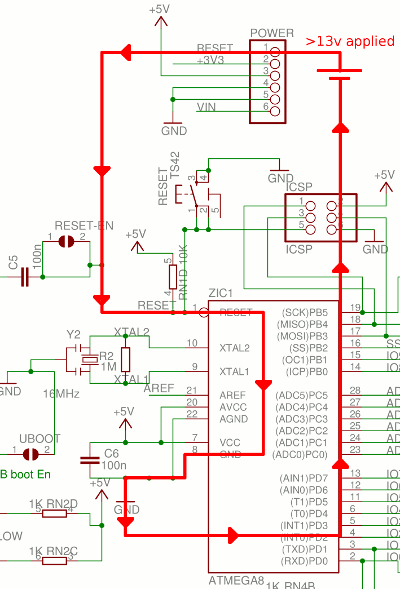
Method #9: 提供超過 13V 到 Reset Pin 上
HOW
對 RESET 針腳輸入 > 13V電壓。ATmega328P 微控制器將會損壞。
WHY
RESET 針腳直接連接到 ATmega328P 上的RESET pin。雖然此 pin 可容忍 13V電壓,若輸入更高的電壓將會損壞晶片。
|
|
The Reset connector pin is directly connected to the reset pin on the ATmega328P. While this pin tolerates 13V, higher voltages will damage the device. |
Method #10: 超過微控制器所能負載之電流量
HOW
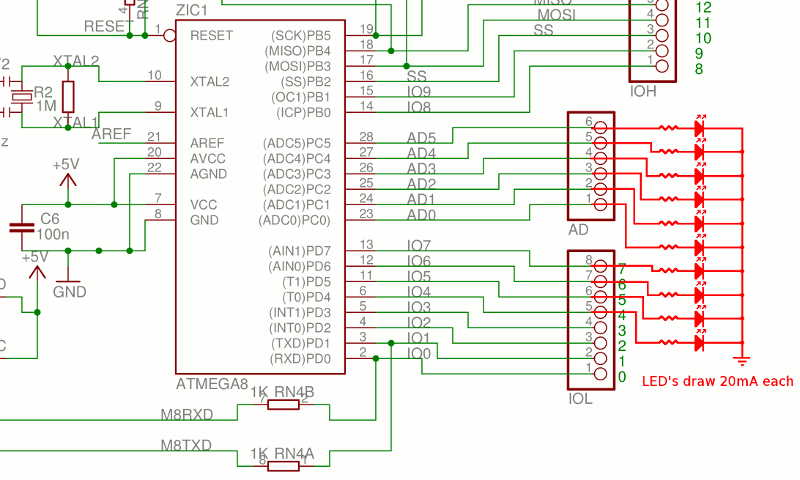
查看你的配置,如果至少有10組 I/O 針腳或更多在運作,並從每個消耗 20mA (例如 10盞 LED 的照明)。這樣就已超過了微控制器所能承仔的總供給額定電流,它將會損壞。
征服畏懼建立自信的最快最確實的方法,就是去做你害怕的事,直到你獲得成功的經驗。
人生最大的光榮,不在於永不失敗,而在於能屢僕屢起。
要銘記在心:每天都是一年中最美好的日子。
成功的信念在人腦中的作用就如鬧鐘,會在你需要時將你喚醒。


